
Diamonds are forever
Page 1 of 1

Diamonds are forever
![]() flashy Tue Sep 21, 2010 11:52 am
flashy Tue Sep 21, 2010 11:52 am

Tube of your choice. I used the lovely artwork of Keith Garvey, which can be found here :
www.mypsptubes.com
Plugins:
Two moon, and quilt which can be found here:
http://www.fleursauvage.be/utilitaire/filtres/filtres.htm
Xero, and radiance, which can be found here :
www.xero-graphics.co.uk
Alienskin xenolfex 2, and constellation, which can be found here:
www.alienskin.com
Supplies:
Diamond ring frame and embellishments and doodles, which can be found here :
https://flashy.forumotion.co.uk
Lets begin !
Open a 600x500 new image and floodfill in white.
Open the diamond frame 2, then duplicate it. Name the duplicate layer .... sparkle.
Staying on the duplicate layer, magic wand, go to selections, modify by 5.
Add a new layer and fill with a colour to match your tube. I used #a1c6e1.
Go back to the duplicate frame layer and deselect. Keep 'sparkle at the top of the layers for now.
Drag the new colour frame background layer to above raster layer 1.
Go to effects, and choose the plugin Two Moon, and quilt. Use the settings as shown below:
add some, take some = 211
take some away, add = 176
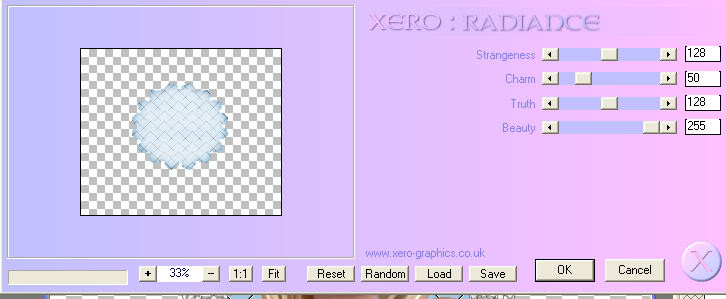
Now go to effects and Xero, Radiance, and use the settings as shown below:
Click into the original diamond frame ring. Selections and modify by 5.
Open your chosen tube, as we will be using a close up of the face from it.
When your happy with your tube, paste into selection. Deselect the frame.
X out raster 1, and your sparkle layer. Add a drop shadow as follows:
vertical=2
horizontal=2
opacity=90
blue=10.00
colour=black
Un X layers, and remember to keep the sparkle layer above the merged layer.
Click on raster layer 1 and add a new layer. Floodfill in the same colour you
used for the background. Open mask 1 and promote it to a raster layer.
On your chosen colour layer, go to layers, new mask layer from image.
Choose mask 1, invert mask data checked, and source luminance checked, and ok.
In the layer palette, merge group. *optional* .. Now duplicate so it stands out more.
Merge visible just the two mask layers. Resize by 110.
Add the dangly embellishment, and the flower, and place on the image where you choose.
Add a drop shadow.
If you want to make your embellishments sparkle, then at this stage, X out everything else
and merge visible with the 'sparkle' frame. Rename sparkle.
Add your full tube as a new layer and position to one side of the frame.
Bring this tube layer to the top of the layer palette.
I added a doodle from my brushes, and a few butterflies, which you can find on my site.
With your text tool, size 24, stroke 1, foreground null, background your chosen colour,
type the word art i used. I duplicated and merged visible, so it stands out better.
Resize a dangly embellishment or a flower, and add after your text.
Add your credits, and your name if you wish to.
Click on the sparkle merged layer, and go to Alien Skin Xenoflex 2, and constellation.
Use the settings as shown below :

Open Animation Shop, and copy merged, and paste as a new animation. Back to PSPro
and use the back button, and remove the constellation settings you just used.
Use constellation again on the sparkle layer, and click on random seed.
Back to Animation Shop, and paste after current frame.
Go to edit and select all. Now go to animation and choose frame properties.
Set the display to 14.
Now animate ! Save as a Gif file.
Thats it your done !
I hope you enjoyed this tutorial.
© Flashy
September 2010
September 2010

flashy- Admin
- Posts : 496
Join date : 2010-03-11
Page 1 of 1
Permissions in this forum:
You cannot reply to topics in this forum|
|
|