All yours xx
Page 1 of 1
 All yours xx

A tube of your choice. I am using the lovely artwork of Keith Garvey, wwhich can be purchased here:
www.mypsptubes.com
Plugins needed:
VM Experimental, and Magnetic Detection.
MuRa Meister, copies. Both can be found here:
http://fleursauvage.be/utilitaire/filtres/filtres.htm
Supplies needed:
Flower template, diamond flower, and tut flower embellishment, Mask 1 which can be found here:
https://flashy.forumotion.co.uk
Lets begin!
Open a new image 600x500 and floodfill in white. Using the ellipse tool, foreground white, background
null, width 4, draw a circle for the centre frame. Objects, align, centre in canvas. Convert to raster layer.
Now for another circle, this time foreground #f99bf4, width 22. Objects, align, centre in canvas and convert to
raster layer. Drag this below the white frame.
Plugins and VM Experimental, and Magnetic Detection, using the settings as shown below:

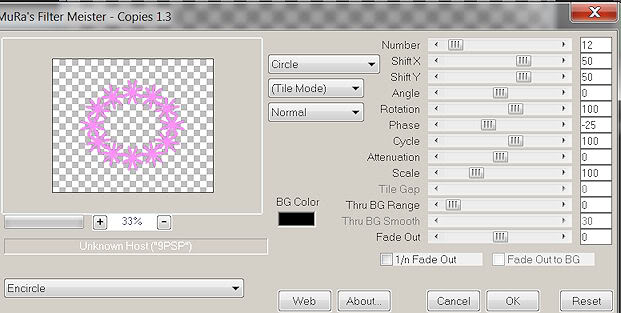
Using the flower template, add as a new layer and centre in canvas, and go to plugins, and MuRa Meister copies,
use the below settings:

If needed, use the deform tool to make it fit so it shows around the large frame edges. Click inside the white frame, click on the flower ring frame and hit delete, then deselect. This will get rid of any inner edges showing. Drag this layer below the large frame. Now apply the same Magnetic Detection settings as before, using selections, select all, float and defloat first, apply, then deselect.
The ellipse tool once more, foreground white, background null, line style, diamond, width 3. Draw this circle, and centre it as a fancy part of the large frame. Convert to raster layer. Use my tag as reference. Place this layer above the large frame.
Add the diamond flower as a new layer and centre in canvas. Drag this below the large frame layer. Duplicate and rotate about 15 degrees left.
Now for the frames background. Ellipse tool again, foreground null, background #f99bf4, make a circle that fits behind the frames, but does not show on the outer edges. Convert to raster layer and drag this above raster
layer 1.
Click on the background layer, and add a close up of your chosen tube as a new layer. Click on the first white
frame that we made. Using the magic wand, click inside the frame, and go to selections, modify, and expand by 3.
Make the tube layer active in the layer palette, and hit delete, then deselect. Blend mode, and choose overlay, then lower the opacity to 55.
Add your main tube as a new layer, and position to one side of the frame. I chose to have it showing in,
and out of the frames.
Now to add drop shadows to everything, using the settings below:
V=2
H=2
O=60
B=4.30
Col=black
X out raster layer 1, and merge visible. This makes life easier! Un X raster layer 1. Still on raster layer 1, add
a new layer and floodfill in #f99bf4. Layers, new mask layer from image, choose Mask 1 from the source window,
and have source luminance and invert mask data checked, and apply. Merge group. If you would prefer a deeper colour mask, then duplicate the mask layer.
Now for your name, font used is Castellar, stroke 1, size 28, foreground black, background #ff90f9. Convert
to raster layer. Selections, select all, float and defloat. Use the Magnetic Detection settings again, and
deselect. Add a drop shadow.
Add the flower embellishment to the lower right hand part of the frame. Add a drop shadow.
Add the leaf detail as a new layer, place this layer under the mask layer,
as it gives a kind of purple hue, instead of the harsh black. Position at the top right hand
of the frame. Duplicate, and image, flip, image, mirror. No drop shadow.
The word art is font Vivaldi, size 18, stroke 1 in black and the same pink as before. Add a drop
shadow as follows:
V=1
H=1
O=40
B=4.30
Col=black
Position this on the left hand side of the tag, use mine as reference.
Add your credits.
Thats it, you are all finished! I hope you enjoyed this tutorial.
© Flashy
2nd November 2010
2nd November 2010

flashy- Admin
- Posts : 496
Join date : 2010-03-11
Page 1 of 1
Permissions in this forum:
You cannot reply to topics in this forum|
|
|
